Client Rule
Groupwise Client Rules
SPAM Rule | Spam/Virus Rule | Vacation Rule
Setting up a Rule for Spam
Setup a new folder (For example: Spam )
- Right click on your mailbox and select new folder. Click Next.
- Enter a name (For example: Spam)
- Use the up/down/left/right tabs to position the folder in the location you want (directly under the Mailbox folder would be convenient)
- Click Next, and Finish
To create the rule
- Click Tools, click Rules, then click New.

- Type a name in the Rule Name box - such as Spam
- Under to When Event Is pop-up list select Received next to New Item
- Under If conditions are select Mail
- Click Define Conditions.
- Select Subject from the drop down box. Add to the box [JSpamFilter], and click ok to end.
- Click Add Action, then click the Move To Folder and select the new folder you created called Spam. Click to add a check mark in the box to the left of this folder.
- Click Save.
For a rule to function, it must be enabled - do this by clicking the box to add a checkmark.
Setting Up a Rule for Spam / Virus Attached Emails
Please be aware that this rule handles both Spam & emails that contain actual viruses (filtered by warning.txt)
- Right click on your mailbox and select new folder. Click Next.
- Enter a name (For example: Spam)
- Use the up/down/left/right tabs to position the folder in the location you want (directly under the Mailbox folder would be convenient)
- Click Next, and Finish
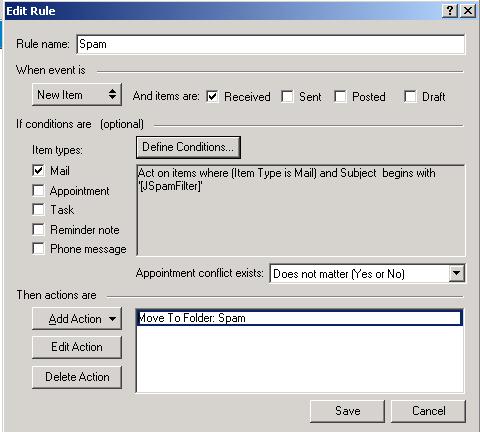
To create the rule (as shown below)
- Click Tools, click Rules, then click New.

- Type a name in the Rule Name box - such as Spam
- Under to When Event Is pop-up list select Received next to New Item
- Under If conditions are select Mail
- Click Define Conditions.
- Select Subject from the drop down box. Type in the box [JSpamFilter] click OR, select the drop down box again and click on Attachments contains and type in "WARNING.TXT" and click OK to end.
- Click Add Action, then click the Move To Folder and select the new folder you created called Spam. Click to add a check mark in the box to the left of this folder.
- Click Save.
For a rule to function, it must be enabled - do this by clicking the box to add a checkmark.
To Create a Simple Vacation Rule in Groupwise
- Click Tools, Rules, New
- Type a Name in the Rule Name box, such as Vacation Rule
- Under the When Event Is pop-up list, select Received (which should be the default) next to New Item. Make sure no other item source is selected.
- Do not make any selections under Item Types
- Use Define Conditions to add specific information to your rule. The following are examples of using Define Conditions:
If you want to set up the dates during which the rule is in effect: - Click Define Conditions
- Click Delivered in the first drop-down list
- Click On or After Date in the second drop-down list
- In the date field, select the date you are leaving on vacation.
- Click the End pop-up list
- Click And
- On the next line, click Delivered in the first drop-down list
- Click On or Before Date in the second drop-down list in the date field, select the date you are returning from vacation
- Click OK.
- Click Add Action and select Reply from the list then click on OK.
- Type a message, for example:
I will be out of the office from September 3-September 10. If you need assistance during this time, please contact Martha Robbins at extension 1234. - Click OK, click Save
- Verify that the rule has a check mark next to it, indicating that it is enabled
- Click Close.
Rules that trigger a reply (such as this vacation rule) keep a record of who a reply has been sent to, and make sure that a reply is sent only once to that user.
